


Tips from Affinity Legal’s Danielle DavisRoe. Microsoft Word’s editor, dictation and text prediction features are all based on AI.

Table of contents
You can take advantage of cutting-edge technology, AI, without leaving Microsoft Word or adding to your tech stack. Word’s editor, dictation and text prediction features are all based on artificial intelligence. Enable online speech recognition by navigating to the “Home” menu in Microsoft Word and clicking on the “Dictate” button. With dictate and text prediction, you can write faster. With the editor, you can quickly become a better writer.
Want to learn how to get even more out of Microsoft Word? Check out Affinity Consulting Group’s “Microsoft Word for Legal Professionals“ for in-depth instructions on getting the most out of Word.
1. Getting Started with Speech Recognition in Microsoft Word
To get started with speech recognition in Microsoft Word, you’ll need to make sure you have a few things set up first. Here’s a step-by-step guide to help you get started:
- Open Microsoft Word: Launch Microsoft Word on your computer and create a new, blank document. This will be your workspace for dictation.
- Check your microphone: Ensure your microphone is plugged in and working properly. You can test your microphone by speaking into it and checking if the sound is being picked up.
- Enable speech recognition: Navigate to the “Home” menu in Microsoft Word and click on the “Dictate” button. If you don’t see the “Dictate” button, type “Dictate” in the search bar and select the “Dictate” result.
- Select your language: In the “Dictation Settings” window, choose your language from the drop-down menu. Microsoft Word supports multiple languages, including English, Spanish, French, German, Italian, Portuguese, and more.
- Start dictating: Click on the “Start dictation” microphone icon and begin speaking. Your spoken words will be converted into text in your Word document.
By following these steps, you can easily set up and start using speech recognition in Microsoft Word, making your writing process faster and more efficient.
2. Write Faster With Dictate Button
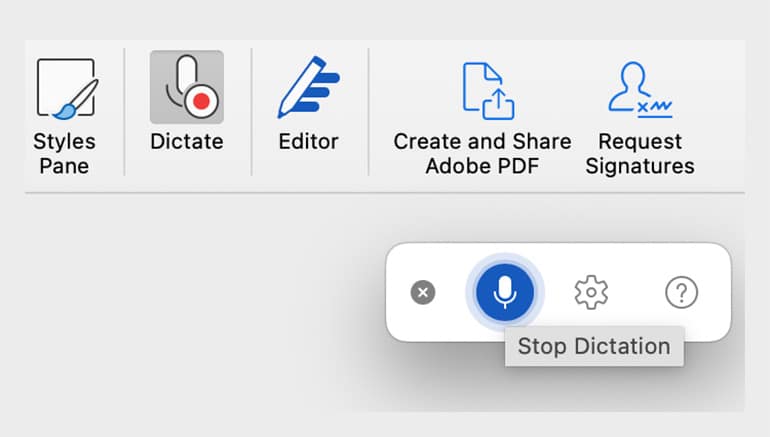
You’ll find the Dictate button on the home ribbon in the voice group. Clicking on the button will open a floating toolbar and automatically turn on dictation. You’ll know it’s ready when it indicates that it’s listening to you.
Initially, when you start talking, it may look like nothing is happening. Give it a moment, and you’ll see the words start to appear in gray. You can keep talking while you wait for them to appear.
Whenever you pause, the speech-to-text feature will take the moment to figure out how to punctuate your text. Since the feature does this automatically, you don’t need to interrupt your train of thought with punctuation instructions. You may, however, want to tell it to start a new paragraph with the command “new line.”
Dictate only has a few settings. From the gear icon on the dictate toolbar, you can change the language, turn on/off automatic punctuation, and turn filtering sensitive phrases on or off.
You can also use the dictation feature when drafting emails in Outlook or preparing PowerPoint presentations.
3. Mastering Voice Typing in Microsoft Word
Once you’ve got speech recognition set up in Microsoft Word, it’s time to master voice typing. Here are some tips and tricks to help you get the most out of voice typing:
- Use punctuation commands: Microsoft Word allows you to insert punctuation marks using voice commands. For example, you can say “period” to insert a period, “comma” to insert a comma, and “new line” to start a new line.
- Use voice commands: In addition to punctuation commands, you can also use voice commands to format your text. For instance, you can say “bold” to bold your text, “italic” to italicize your text, and “underline” to underline your text.
- Use the floating dictation menu: The floating dictation menu provides a range of options for formatting your text, including font size, color, and style. Access the floating dictation menu by clicking on the “Dictation Settings” cog icon.
- Practice, practice, practice: The more you use voice typing, the more accurate it will become. Practice dictating different types of text, including emails, documents, and reports.
By mastering these tips, you can enhance your voice typing skills in Microsoft Word, making your writing process smoother and more efficient.
4. Type Faster With Text Predictions in Microsoft Word
Even if you aren’t ready to start dictating, you can still harness the power of AI to type faster with text predictions. The text prediction feature offers to finish typing a word or suggests the next few words for you based on what you’ve already typed. This is similar to how texting works on your smartphone.
When Word has a suggestion, you’ll see the suggestion in gray to the right of your cursor. If you like what it suggests, hit the tab key to keep the suggestions. If you don’t like what it suggests, you can ignore the suggestion and just keep typing or hit the ESC key.
If you use the same phrases frequently, you may find text predictions to be especially helpful.
If you’d prefer to turn text predictions off, you can toggle it off and on from the status bar (the bar at the very bottom of your Word document).
If your status bar doesn’t indicate whether text predictions are on or off, right-click anywhere on the status bar and click on text predictions to add the feature to the status bar. Once it’s showing, click on it to toggle the predictions on or off.
By learning to use speech to text effectively, you can significantly enhance your productivity.
5. Write Better With Microsoft Word’s Built-in Editor
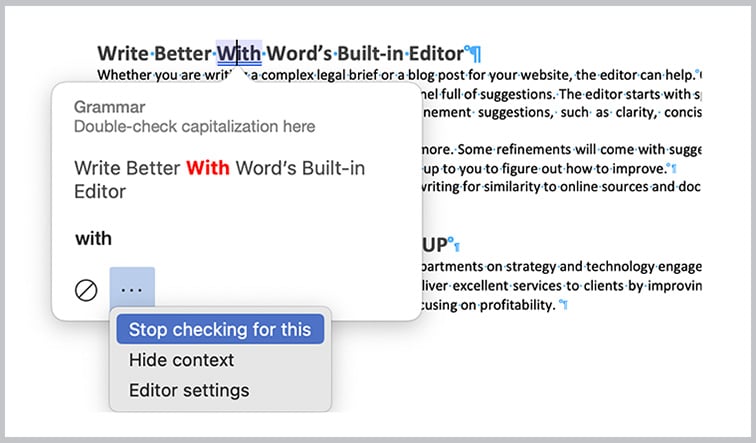
Whether you are writing a complex legal brief or a blog post for your website, Word’s editor can help. On the home ribbon, click on the Editor button to open a panel full of suggestions. It starts with spelling and grammar check. Those are followed with refinement suggestions, such as clarity, conciseness, punctuation conventions and vocabulary.
Click on a type of correction or refinement to learn more. Some refinements will come with suggestions on how to rewrite the phrase at issue. For others, it will be up to you to figure out how to improve them.
Editor also comes with the ability to check your writing for similarity to online sources and document stats (such as word count).
6. Troubleshooting and Best Practices
Here are some troubleshooting tips and best practices to help you get the most out of speech recognition in Microsoft Word:
- Check your internet connection: Speech recognition requires an internet connection to work. Ensure your internet connection is stable and working properly.
- Use a high-quality microphone: A high-quality microphone can improve the accuracy of speech recognition. Consider investing in a good-quality external microphone.
- Speak clearly and slowly: Speak clearly and slowly when dictating text. Avoid mumbling or speaking too quickly, as this can reduce the accuracy of speech recognition.
- Use the keyboard shortcut: You can use the keyboard shortcut Alt + ‘ to toggle dictation on and off. This can be useful if you need to switch between typing and dictating text.
- Save your document regularly: Make sure to save your document regularly when using speech recognition. This will help prevent any loss of data in case of a technical issue.
By following these troubleshooting tips and best practices, you can ensure a smooth and efficient experience with speech recognition in Microsoft Word.
About Affinity Consulting Group
Affinity Consulting works with law firms and legal departments on strategy and technology engagements that help them create a great place to work and deliver excellent services to clients by improving how work gets done, aligning their stakeholders, while focusing on profitability.
©iStockphoto.com
Sign up for Attorney at Work’s daily practice tips newsletter here and subscribe to our podcast, Attorney at Work Today.